ShopDreamUp AI ArtDreamUp

Deviation Actions


Suggested Deviants


Suggested Collections


You Might Like…


Featured in Groups


Description
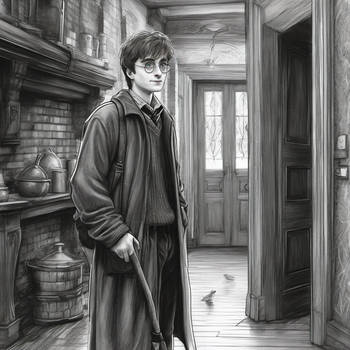
Quickie Harry Potter sketch that somehow turned into a step-by-step look at my colouring process, sort of. It's not anything fancy, but it's quick and dirty and someone might find it useful. I have Photoshop CS3, but the techniques are pretty basic; I use the default brushes for everything, on an ancient pen tablet. (NOTE: Download for a bigger, jucier version that's much easier to see.)
Okay, here we goooo!
~~~
1. ROUGH SKETCH: A quick sketch in blue, just to get a rough feel for the pose and how it sits in the frame. As you can see, it doesn't have to be pretty, but I like to at least get the proportions right.
2. REFINED SKETCH: I put another layer over top and refine the sketch, adding more detail and facial features. It's tight enough so that I can do a clean line over top without too much guesswork, but still leaves room for minor changes.
3. CLEAN LINE: Yet another layer, this time using pure black with the default hard brush. I could have gone with a cleaner line, but I felt like going a little bit sketchy this time. (I just noticed I gave him more of an irritated expression than he had in Step 2, for some reason. Maybe he just spotted Malfoy walking down the hall.)
4. BASE COLOUR: Here's where things get a bit technical. I use the Magic Wand (ha ha, how appropriate) tool to Select the area AROUND Harry, then I Invert the selection so that Harry's outline is all selected. Then I go to the Select menu and Contract the selection by 1 pixel to avoid those nasty white bits that always happen when you use the Wand. Then I create another layer and use the Fill tool to make a solid colour layer underneath my original lineart.
5. SEPARATE COLOUR: I lock the Transperancy on my Colour layer so that no matter how messy I get, my colour will not stray outside of the lineart! Then I just do my flat colours. They're approximate to what I think the final colours will be; his skin is kind of peach coloured, his robes are dark blue, etc.
6. TONE: Some people do the shadows BEFORE the colour on a different layer, but for this, I just did my tones right on my Colour level. I used another of the default brushes, basically just a version of the original brush where the pen pressure affects opacity rather than brush size. The brush therefore only has one width, which is kind of annoying, but I like the soft effect it gives.
7. TOUCH-UP: Along the way, I use Color Balance, Replace Color, Levels and Hue/Saturation to tweak everything a bit. These are all in the Adjustments menu. My colours are almost always too bright at the outset, so I lower the saturation and bump up the contrast. Then I rather lazily slapped a random texture over top, just to see what would happen, and left it like that. I dunno if I like it or not. Whatever, it's an easy enough step to skip.
I also locked the Transperancy on my line art so I could colour the lines a bit, especially his scar, as you can see in step 6. You can't really tell, but that's okay. It's just fiddly stuff at this point.
8. FINAL ADJUSTMENTS: I kind of wish I had just left the texture on his book or something, but I'm too lazy to change it now. I bumped up the Saturation and Levels a wee bit; I kind of like over-saturated images, but anyone who prefers the previous step can stop wherever they like.
~~~
And there you have it: This is pretty much how I colour most of my projects, with little variation. For cel-shaded characters, I just duplicate the flat colour layer from step 4, lock the transperancy and fill it completely with a very dark colour (usually blue). That becomes my shadow layer. I put it over top of my colour layer and reduce the opacity, UNLOCK the transperancy, and simply use the Eraser tool on whatever area is being hit with light. Maybe I'll do a different tutorial for that later, if I feel like it. Anyway, hopefully someone found this helpful!
Image size
4893x1580px 1.82 MB
© 2010 - 2024 animagess
Comments9
Join the community to add your comment. Already a deviant? Log In
hhhooowww nice :3